Five easy steps to configure static VxLAN Part 1

In this blog post I will cover static VxLAN tunnels, it means no multicast flood and learning or BGP with EVPN signalling. Part 1 will cover “Static VxLAN tunnels between two Linux hosts” and you could have guessed already that there will be Part 2 and Part 3, or even more, who knows. Future subjects of blog posts will be kept secret for now.😉
Introduction to VxLAN - Virtual Extensible LAN
I will try not to bother you with heaps of theory that you can find in the books or on the Internet. However I will mention some important facts about VxLAN. So, What is VxLAN? It is just yet another encapsulation, which allows you transporting L2 frames over L3 network and that way extending L2 domain. Moreover, it provides flexibility and scalability and solve limitations of 4096 vlans. Also it introduces overhead of 16 bytes (UDP 8 bytes + VxLAN header 8 Bytes). So because of that the underlay network should support MTU size 1600 bytes, not less. VxLAN adds header to original L2 frame and encapsulates all to UDP and transport via underlay IP network. VTEPs (VxLAN Tunnel Endpoint) are the points on network (server) nodes where traffic will be packed to encapsulation and on remote point unpack and send to final destination.
Below you can see L2 frame before and after encapsulation to VxLAN.

It’s time to stop talking and start lab configuration.
Part 1 Static VxLAN between two Linux hosts
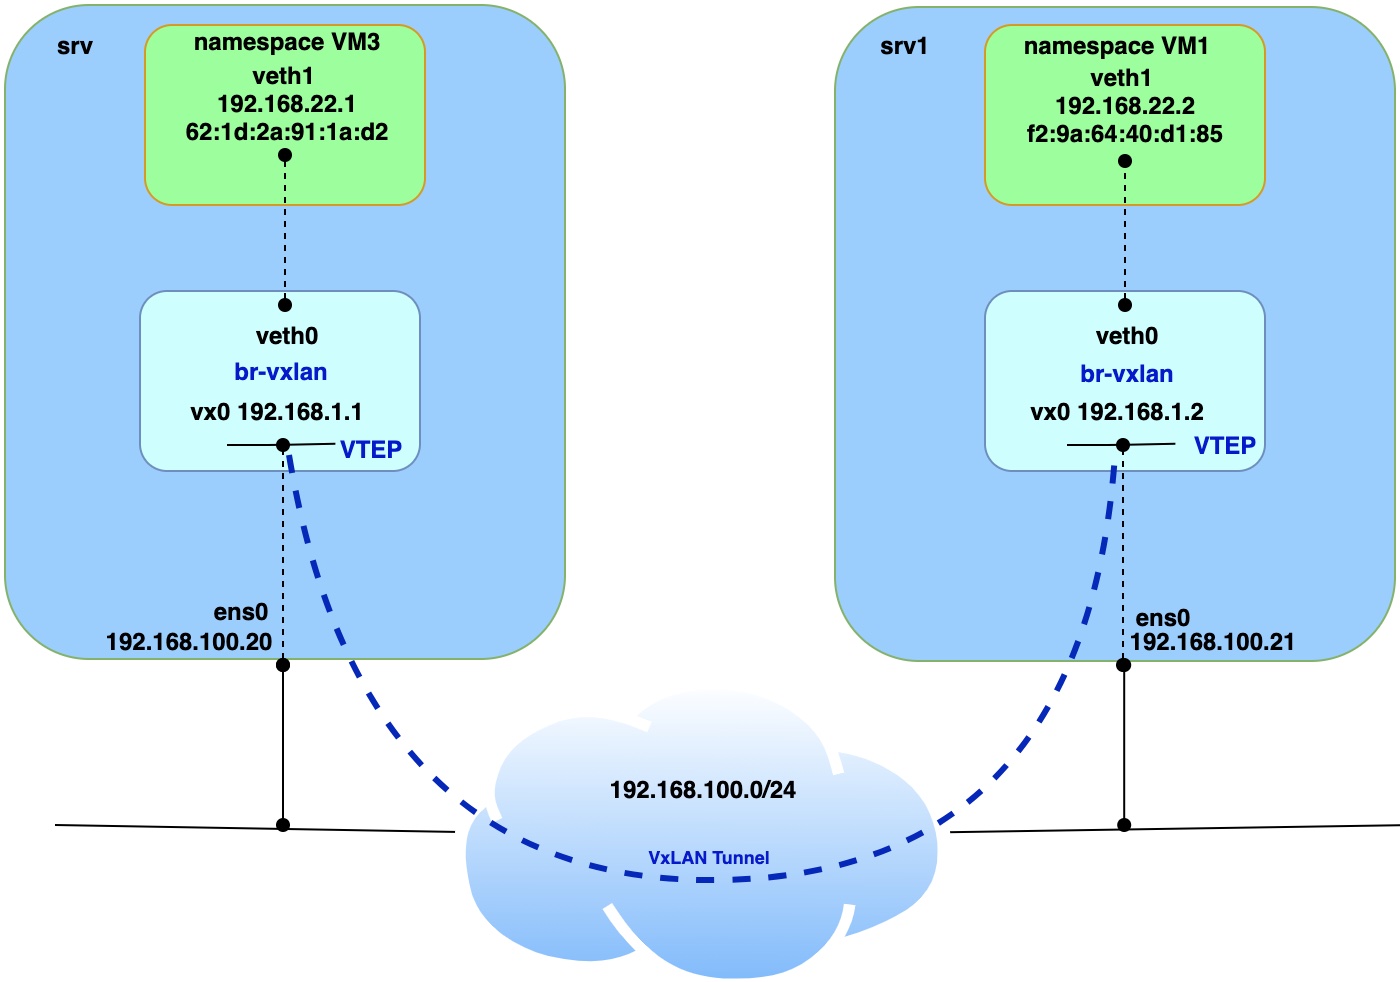
In Part 1 I will cover the case when we have two physical servers and the requirement is to connect virtual machines to one subnet. For the sake of simplicity, physical servers will be deployed as virtual machines on baremetal KVM host and they will represented as “srv” and “srv1”. Nested VMs will be simulated with Linux network namespaces. This way we can save hardware resources on KVM host. Details on how everything is interconnected you can find below on the network diagram.

Prerequisites for servers (virtual machines):
| VM name | OS Version | Extra installed SW |
|---|---|---|
| srv | Ubuntu 20.04 | bridge-utils |
| srv1 | Ubuntu 20.04 | bridge-utils |
Step 1. Run VMs and install bridge-utils
Let’s assume that virtual machines “srv” and “srv1” are successfully deployed on KVM host and bridge-utils were installed on both VMs using the command below:
apt install bridge-utils
version of bridge-utils we can check from CLI from srv and srv1 with the following command:
apt list | grep bridge-utils
output should be
bridge-utils/focal,now 1.6-2ubuntu1 amd64 [installed]
version can vary.
Step 2. Create and configure namespaces, bridges and veth interfaces pairs
Creation of namespaces.
Apply configuration on srv.
ip netns add vm3
Apply configuration on srv1.
ip netns add vm1
Creation of bridges on both host VMs.
ip link add br-vxlan type bridge
ip link set br-vxlan up
ip link set mtu 9000 dev br-vxlan
Disable spanning-tree on the bridges
brctl stp br-vxlan off
Creation of veth interfaces on both host VMs.
ip link add veth0 type veth peer veth1
ip link set up veth0
ip link set veth0 master br-vxlan
Apply configuration on srv.
Adding IP address on veth1 and bring interface up
ip netns exec vm3 ip a a 192.168.22.1/24 dev veth1
ip netns exec vm3 ip link set up veth1
Apply configuration on srv1.
Adding IP address on veth1 and bring interface up.
ip netns exec vm1 ip a a 192.168.22.2/24 dev veth1
ip netns exec vm1 ip link set up veth1
Step 3. Configuration of VxLAN Tunnel
Creation of VxLAN tunnel interface vx0 on srv and srv1.
Create VxLAN tunnel interface with VNI 100.
ip link add vx0 type vxlan id 100 local 192.168.100.20 remote 192.168.100.21 dev ens0 dstport 4789
Add IP address on tunnel and bring up interface.
ip a a 192.168.1.1/24 dev vx0
ip link set vx0 up
Add VxLAN tunnel interface to specific bridge.
ip link set vx0 master br-vxlan
Apply configuration on srv1.
Create VxLAN tunnel interface with VNI 100.
ip link add vx0 type vxlan id 100 local 192.168.100.21 remote 192.168.100.20 dev ens0 dstport 4789
Add IP address on tunnel and bring up interface.
ip a a 192.168.1.2/24 dev vx0
ip link set vx0 up
Add VxLAN tunnel interface to specific bridge.
ip link set vx0 master br-vxlan
Step 4. Add static MAC record to forwarding database
Apply configuration on srv.
bridge fdb append 00:00:00:00:00:00 dev vx0 dst 192.168.100.21
Apply configuration on srv1.
bridge fdb append 00:00:00:00:00:00 dev vx0 dst 192.168.100.20
Step 5. Connectivity check
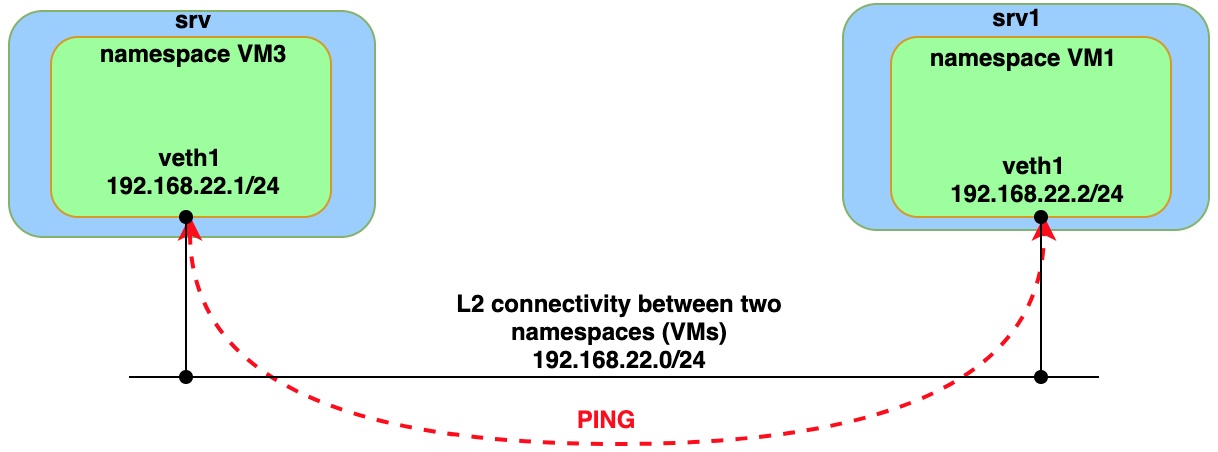
Run PING command from both VMs (namespaces).

Issue ping from VM3 (namespace)
sudo ip netns exec vm3 ping 192.168.22.2 -- > remote IP inside namespace VM1
Issue ping from VM1 (namespace)
sudo ip netns exec vm1 ping 192.168.22.1 -- > remote IP inside namespace VM3
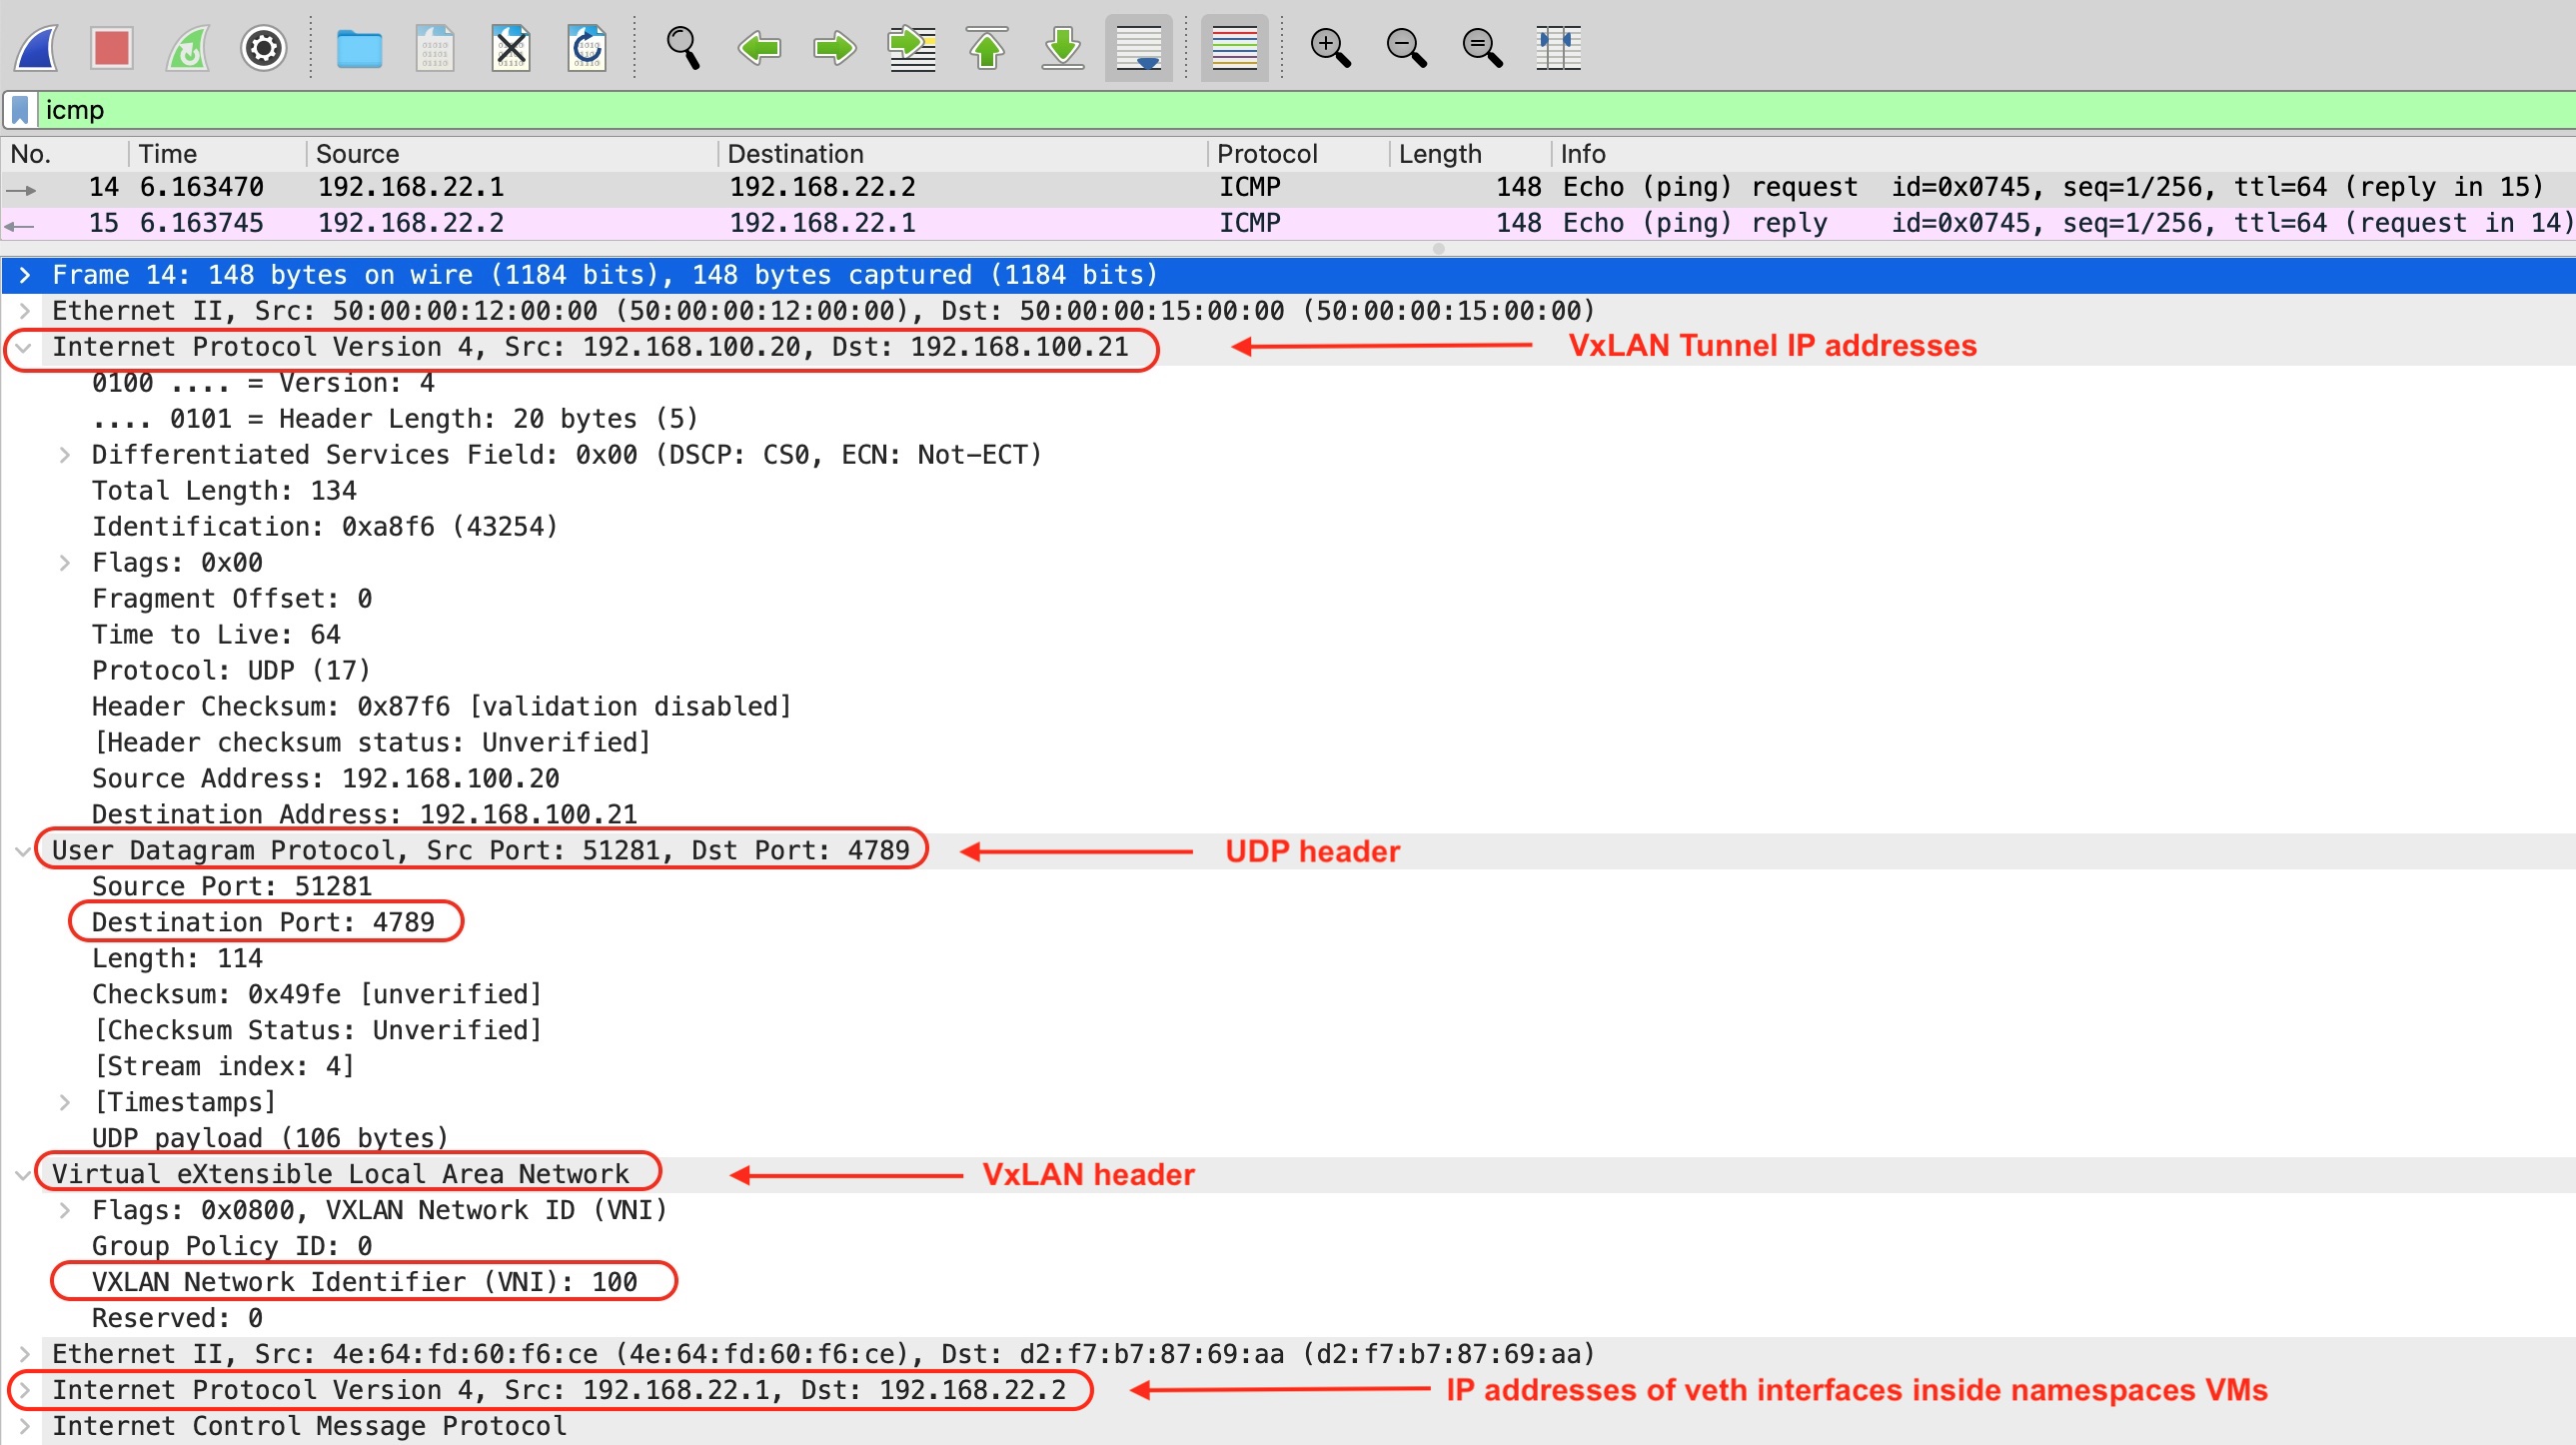
Below is capture which is prove that all ICMP packets (request, reply) were encapsulated to VxLAN.

Part 2 Static VxLAN between Ubuntu and Cumulus VX vSwicth
Part 3 Static VxLAN between Ubuntu Hosts and Cumulus VX vSwitch DC Gateway
Part 4 Static VxLAN Data Center Interconnect